Thursday, October 2, 2008

The "Classy" Countertop


After the benches project, my Dad went to work on building the countertop unit....complete with sink, propane stove and bar fridge!! He shaped the counter in a rounded way because he came to really love working with rounded edges on the round little camper (ya right). The curves looked great.....

But what we weren't prepared for was how classy the countertop would look with the fermica that I chose....we thought the "country girl" theme would be a little tackier - not quite so classy. Dad offered to tear it out but no way - it made the whole trailer look AWESOME!! Thanks Dad!

Dad had somehow managed to extend the counter to give me a shelf on the right side - which is over the bench only a bit. This is unused space anyways and even if someone was to sleep on the bench that end is where their feet would go. The table also looks amazing with this finishing touch. We still need to get trim to finish the edges but I am very pleased with my little dining room! Dad attched the table with a clip to the wall so the table is steardy
.....and we got to try it out (taken at a later date)....our first dinner in the "Shypod"!!


Dad also has been busy mounting the battery boxes to the back of the Boler. One box contains the battery, and the other holds the inverter and converter (which I am still learning the purpose of). All I need to know is that I will soon have electricity for my lights and fridge, running water for my sink and a working propane stove - all the luxuries this princess could ever wish for!


Mom has one more cushion to cover which serves as the back rest at the front. She has finished it but I have not yet seen her creative idea on this. The back rest makes sitting here much more comfortable and here's Dad & I trying it out!


Getting so much closer to Gettin' 'R Done! (and so grateful for all the help from my Mom & Dad!)

Wednesday, June 11, 2008

Boler Benches

For the front bench; we decided it would be nicer to access the storage space by adding doors to the top of the bench so you wouldn't have to get on your hands and knees to get stuff out from underneath. Dad cut out 3 doors to allow this access.

Then to hold the doors in place - framing was done on the underside to make a lip for the doors to rest on. this allowed them to sit perfectly in their place


So I painted the bench while Dad started on the next job of cutting a face plate for the front of the bench. The sides of the Boler are raised a bit higher then the centre so a few measurements were made and of course - the challenge of the rounded sides to make it fit just right.


Then I painted the two back benches with a high-duability paint. This made them look brand new and although I do expect some scuffs from peoples shoes while sitting at the table - I hope they will easily wash off (or I'll just paint over it!)

Dad moved on to securing the cupboard/microwave stand to the side of the Boler. He did this by attaching small pieces of wood to the inside of the cupboard and screwing in from the outside.

We called it a day after this so then I just took a few pictures of my appliances before they were installed. My new fridge, bar sink, propane stove, and microwave. With all these little luxuries you can hardly call it "camping"!


Tuesday, May 6, 2008

A Blogging Course

I am learning to blog and hoping this will help me learn - I wish their was a "Blogging for Dummies" manual - there probably is but for now I'll try this out. Maybe you will see my advanced blogging skills after checking this out! I'll keep you posted!

I'm evaluating a multi-media course on blogging from the folks at Simpleology. For a while, they're letting you snag it for free if you post about it on your blog.

It covers:

  • The best blogging techniques.
  • How to get traffic to your blog.
  • How to turn your blog into money.

I'll let you know what I think once I've had a chance to check it out. Meanwhile, go grab yours while it's still free.


I also found a helpful site that has helped provide many answers to my "dummy" questions about blogging - if you are new like me - you will want to check it out!

Tips for New Bloggers

Wednesday, April 30, 2008

The Cushion Mission

Foam and Fabric....

We needed to replace all the cushions in the trailer. We purchased to pieces of 4" thick foam. One at 60" X 80" for the back cushions for the bed and one at 30" X 72" for the front bench.
We traced the wooden front bench on to the smaller peice of foam for the shape and we glued on a short piece on the end. (We did this rather than buying a second larger piece at twice the cost).

The back bed cushions required some thought as to how to cut the cushions so when the table was up the would fit along the backs of the seating area. The picture shows the pieces that were cut. This also left a 14" leftover piece which we will use as a 14" high backrest for the front bench.

We are using some fun fabric to cover the cushions. My theme for this decorating truly reveals my personality. We are going with a "Country Girl" style.
To pull this all together we are covering the cuchions with blue jean material with tan suede detail along the edges. We will also be using tan and chocolate suede for the curtains and the pink is for some fluffy pillows!

I am a country girl and camper at heart. I am so looking forward to getting this project in useable condition so I can get out and connect with nature. I am sure when this comes together that I will be the coolest camper at the campground!

Thanks again to my parents for helping me turn this dream into a reality!

More to be revealed.

Shy

Tuesday, April 29, 2008

My Boler Story

Once upon a time....
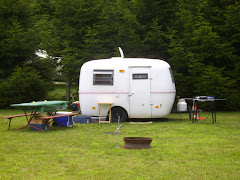
I guess the story starts here with the pictures I took before we started any work on this little fiberglass trailer. The shell was in excellent shape but the inside left a lot to be desired. The interior walls were covered in patches of red shag carpet. Maybe it was good for insulation but it was bad for decoration!

I suspect it was once used for someone who was into hunting and the old furnace inside probably kept them warm....but I am a summer camper so we took that right out. We tore out all the old carpet which was held in with different types of adhesive including liquid nail which was not the easiest guck to get off the walls and ceiling.

The job then required some grinding to remove the chunks of adhesive left behind. Masks we a necessity as the fiberglass dust filled the air and rolled out like steam from a hot shower. We were not going for a smooth texture just a more even surface. A bit of sanding was done before she was ready to be primed and painted.

We applied a coat of mistint that we purchsed at a discount price to use as primer. This covered the fiberglass very well then we applied the top coat. It's amazing how much a coat of paint can improve the appearance of the interior.


I am fortunate to be working on this project with a couple of experts - my Mom & Dad! My dad is the handyman who has taken on the challenge of building the closet and the counter. He also comes up with many great ideas to get the most room out of the 10 foot interior.


My Mom fortunately has excellent sewing skills that are sure needed for recovering new cushions for the bed and bench. I enjoyed picking out the theme and fabric for this job but couldn't do much without her.
So thanks Mom & Dad!!!

I have included pictures of the project this far and will continue to update as we progress.

Happy Camping!

Shy

My Niches

I am going to be setting up some websites soon to generate a residual income. Some of the niches that I have chosen to focus on are:

Support Housing

  • for people with disabilities
  • for people with mentall illnesses
  • for people with brain injuries
  • for those who require special care

Boler Site

  • of interest to fiberglass trailer owners
  • a step-by step how to remodel this unique rounded trailer
  • tips & tricks completed by my family on our first project

Addiction & Recovery

This site will be a more personal sharing site in which I hope to share the intimate details of my journey through addiction and recovery. My disease was progressive from social using to daily use, which eventually led me to crime, homelessness, prostitution, jail and near-death.

My recovery journey has taken place over the last 3 years and I look forward to sharing my experience in hopes of helping someone else find a better way to live.

These are just the first few ideas which I hope to develop into websites over the next few months. I look forward to this journey.

Sincerely,

Shy

My First Million

I am excited to write my first Blog after attending the Engineering Millionaire's Event on the weekend. I am even more excited to be enrolled in the Rip2it Web publishing tool that I am convinced will assist me in making my first million dollars.

I am starting my blog with this entry and will be updateing periodically as my business progresses. I look forward to sharing my new adventure with everyone.

Happy Blogging!

Shy